Enable messaging experiences for Web, iOS and Android apps with AngularJS.
Step 1Include the files
Include the Angular module in your project.
npm install angular-chat
bower install angular-chat
var chat = angular.module('BasicChat', ['chat']);
Step 2Configure
In order to use angularjs-chat, you must configure a connection to a realtime service. This library includes rltm.js as a dependency which lets you switch between realtime service providers like Socket.io easily.
.config(['$authProvider', function($authProvider) {
    $authProvider.github({
      clientId: "GITHUB_CLIENT_ID............",
      redirectUri: "http://localhost:9000/",
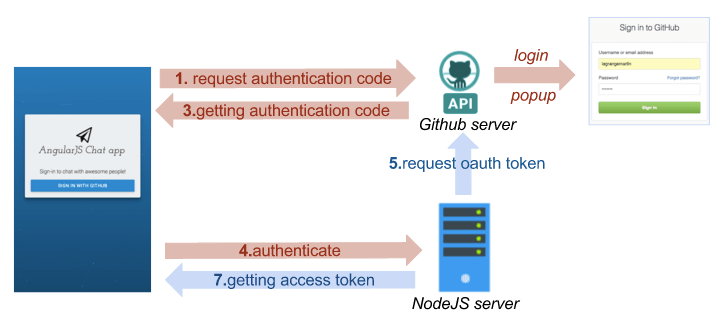
      url: "http://localhost:3000/auth/github",
    });

    $authProvider.httpInterceptor = true;
}]);


app.post('/auth/github', function(req, res) {
  var accessTokenUrl = 'https://github.com/login/oauth/access_token';
  var params = {
      code: req.body.code,
      client_id: process.env.GITHUB_CLIENT_ID,
      client_secret: process.env.GITHUB_CLIENT_SECRET,
      redirect_uri: req.body.redirectUri
  };
  // Exchange authorization code for access token.
  request.post({
      url: accessTokenUrl,
      qs: params
  }, function(err, response, token) {
      var access_token = qs.parse(token).access_token;
      var github_client = github.client(access_token);
      // Retrieve profile information about the current user.
      github_client.me().info(function(err, profile) {
          if (err) {
              return res.status(400).send({
                  message: 'User not found'
              });
          }
          var github_id = profile['id'];
          db.users.find({
              _id: github_id
          }, function(err, docs) {
              // The user doesn't have an account already
              if (_.isEmpty(docs)) {
                  // Create the user
                  var user = {
                      _id: github_id,
                      oauth_token: access_token
                  }
                  db.users.insert(user);
              }
              // Update the OAuth2 token
              else {
                  db.users.update({
                      _id: github_id
                  }, {
                      $set: {
                          oauth_token: access_token
                      }
                  })
              }
          });
      });
      res.send({
          token: access_token
      });
  });
});
Step 3Example Controller
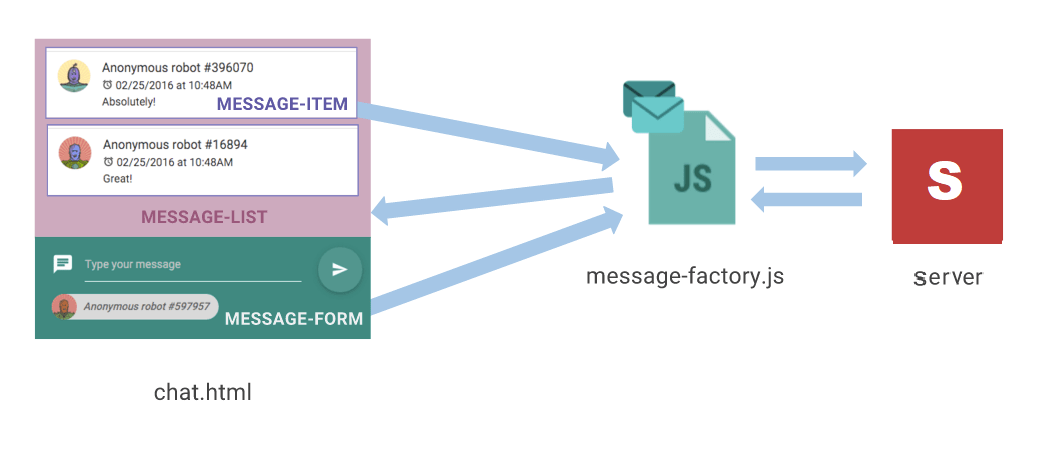
The chat module exposes an object called Messages which includes a send and receive method.
In this controller we keep a list of messages in $scope.messages and push a new message every time the Messages.receive() callback is called.
To send a message over the Internet, we use the Messages.send() method and attach it to ```$scope.send()```` so we can call bind it to the DOM.
chat.controller( 'chat', [ 'Messages', '$scope', function( Messages, $scope ) {
  // Message Inbox
  $scope.messages = [];
  // Receive Messages
  Messages.receive(function(message) {
      $scope.messages.push(message);
  });
  // Send Messages
  $scope.send = function() {
      Messages.send({
          data: $scope.textbox
      });
  };}]);
Step 4Set User ID
Set some identification for this user.
Messages.user({ id: MY_USER_ID, name : sillyname() });
Step 5Send to User
You can receive a 1-to-1 call by adding the user's device token to the server. You can add the token by using the Call.registerPushToken() method.
Messages.send({ to: target_user_id, data : message_body });


Note: If you want random user id's that are transient... you can publish the LIST of users to the "global" channel and receive each user who has come online.